
|
|

|
|
|
|
Welcome to the Australian Ford Forums forum. You are currently viewing our boards as a guest which gives you limited access to view most discussions and inserts advertising. By joining our free community you will have access to post topics, communicate privately with other members, respond to polls, upload content and access many other special features without post based advertising banners. Registration is simple and absolutely free so please, join our community today! If you have any problems with the registration process or your account login, please contact us. Please Note: All new registrations go through a manual approval queue to keep spammers out. This is checked twice each day so there will be a delay before your registration is activated. |
|
|||||||
 |
|
|
Thread Tools | Display Modes |
 22-06-2007, 11:15 AM
|
#1 | ||
|
TICKFORDGUY
Join Date: Dec 2006
Location: kincumber central coast nsw
Posts: 122
|
thinking of getting sum chrome door handles for my au 3 how hard are they to swap over does the door trim have to come off is there any little tricks to them
__________________
MY CAR |
||

|

|
|
22-06-2007, 12:49 PM
|
#2 | ||
|
www.TUFFCARPARTS.com

Join Date: Feb 2006
Posts: 5,221
|
I had mine out a few months ago. I can't quite remember if you have to remove the trims to get the handle completely out, but I don't think you do.
Either way, quite easy to do and you should be able to do all 4 doors in under an hour or so I would think.
__________________
http://i1233.photobucket.com/albums/...psc203b7b1.jpg |
||
|
|
|
|
22-06-2007, 01:37 PM
|
#3 | ||
|
FF.Com.Au Hardcore

Join Date: Aug 2006
Location: Salamander Bay
Posts: 5,427
|
no need to remove trims easy job
|
||
|
|
|
|
22-06-2007, 01:42 PM
|
#4 | ||
|
t i c k f o r d

Join Date: Mar 2007
Location: Melbourne
Posts: 183
|
how's this done without removing the trims?
__________________
AUIII XR6 VCT Liquid Silver / Manual / Leather / Momo Wheel & Shifter / Premium Sound / Lovells Superlows / Koni Reds / T3 Pursuit Rims / Pacemaker 4499s / 2.5 Inch Exhaust |
||
|
|
|
|
22-06-2007, 01:45 PM
|
#5 | |||
|
www.TUFFCARPARTS.com
Join Date: Feb 2006
Posts: 5,221
|
Quote:
__________________
http://i1233.photobucket.com/albums/...psc203b7b1.jpg |
|||
|
|
|
|
22-06-2007, 01:53 PM
|
#6 | ||
|
Back in a Blue Oval

Join Date: May 2005
Location: Karratha WA
Posts: 707
|
nah you will have to remove the trims to be able to play around with the spring and watnot. Because the actual handle assembly itself is riveted to the door, so you just replace the handle itself (get me?) i found that to do this the trim had to be pulled off or else its really difficult to get to the spring. The first one i did took about half an hour (call me a slow learner) then the other 3 took another half hour total.
i also inserted a chrome gear selector surround at the same time. it really livens up the interior and makes it feel a little younger.
__________________
'13 Territory TX Diesel RWD. The Family Bus '08 Mitsubishi Pajero. The Off-road Machine |
||
|
|
|
|
22-06-2007, 02:44 PM
|
#7 | ||
|
t i c k f o r d
Join Date: Mar 2007
Location: Melbourne
Posts: 183
|
Wasn't only series 1 that had the rivets where the whole unit (handle and housing) needs to be replaced rather than just the single chrome handle?
__________________
AUIII XR6 VCT Liquid Silver / Manual / Leather / Momo Wheel & Shifter / Premium Sound / Lovells Superlows / Koni Reds / T3 Pursuit Rims / Pacemaker 4499s / 2.5 Inch Exhaust |
||
|
|
|
|
22-06-2007, 03:01 PM
|
#8 | ||||
|
You can't stop the signal

Join Date: Nov 2005
Location: Behind a computer at work
Posts: 1,624

|
Quote:
I have falkeen's tech article on it, i'll post it here when i find it Cheers
__________________
Quote:
|
||||
|
|
|
|
22-06-2007, 03:05 PM
|
#9 | ||
|
FF.Com.Au Hardcore

Join Date: Jul 2005
Location: Melbourne
Posts: 587
|
I think that the AU1 were riveted to the door, cause thats how mine were. But as far as i know the S2/3 were done with screws.
|
||
|
|
|
|
22-06-2007, 03:07 PM
|
#10 | ||
|
Back in a Blue Oval
Join Date: May 2005
Location: Karratha WA
Posts: 707
|
serious?!? bloody hell they really made it hard for us series one drivers eh!! still only took an hour all up.
__________________
'13 Territory TX Diesel RWD. The Family Bus '08 Mitsubishi Pajero. The Off-road Machine |
||
|
|
|
|
22-06-2007, 03:09 PM
|
#11 | ||
|
FF.Com.Au Hardcore
Join Date: Jul 2005
Location: Melbourne
Posts: 587
|
Yeah they made everything hard for us.....Brakes, door handles whats next..
|
||
|
|
|
|
22-06-2007, 03:09 PM
|
#12 | |||
|
You can't stop the signal
Join Date: Nov 2005
Location: Behind a computer at work
Posts: 1,624
|
AU chrome handle installation Author - Falkeen Here is my procedure on replacing the standard AU series 1 interior door handles with the chrome T-Series items. I replaced all four handles (because the original handles didnt look right with the new black interior), this cost $100 for the set, but most people just do the two front doors. Personal choice, but in my opinion it looks much better having things all matching nicely. 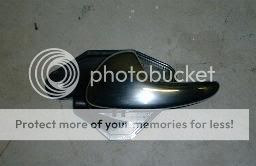 T-Series chrome door handle Part No. ER F 22600 B - R/H side .............. ER F 22601 B - L/H side Removing the old handle This is the main issue with this modification. On the Series 1 models the handle is riveted onto the inner skin of the door (only applies to series 1 as the handle plates were riveted to the door skin, whereas series2/3 were just screwed so can simply be replaced). 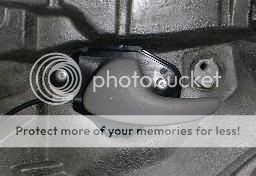 Notice the rivets on either side of the handle After removing the door trim, you will find the door handle as above. The way i got around not being able to take the handle off because of the rivets, i only replaced the handle itself, leaving the original backing plate attached to the door. To remove the handle, slide the white plastic shaft that the handle pivots off then disconnect it from the wire cable. The handle will now come free from the backing plate. NOTE: The plastic shaft has a split in it to prevent it from sliding up and out, you can push this in from the side so that it slides out but i didn't bother as they were going to be discarded anyway. 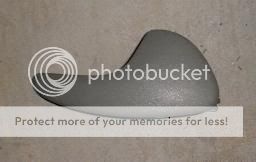 The handle itself will now be free from the backing plate as shown Installing The New Handle First of all, the backing plate needs to be removed from the chrome handle as it is not needed. Pushing the split in on the plastic pin can be done easily as you can do it through the hole in the back of the mounting plate. NOTE: Take note of how the spring is positioned in relation to everything as this will help when re-installing. This is the fiddliest bit of the lot, re-assembling the handle onto the door (but when you think its either this or trying to remove the rivets and then re-fitting the entire handle, it doesnt feel so bad). NOTE: Keep telling yourself this throughout this step as it helps confidence and morale. FIRSTLY, re-attach the wire cable onto the handle! CANT BE DONE LATER (really hurts after finally getting the thing assembled then finding this). Position the spring onto the mounting plate on the door and then carefully slide the new handle on, keeping the spring as much in place as possible (this is the hardest bit!), then slide the new plastic pin down through the holes and spring which holds everything in place. JOB DONE! You can now re-fit the door trim and it should look much better.  New handle installed (missing power window switch plate in this shot. doh!). Now you have no excuses! Falkeen
__________________
Quote:
|
|||
|
|
|
|
22-06-2007, 03:15 PM
|
#13 | ||
|
Back in a Blue Oval
Join Date: May 2005
Location: Karratha WA
Posts: 707
|
down to a T
__________________
'13 Territory TX Diesel RWD. The Family Bus '08 Mitsubishi Pajero. The Off-road Machine |
||
|
|
|
|
22-06-2007, 03:41 PM
|
#14 | ||
|
FF.Com.Au Hardcore
Join Date: Jul 2005
Location: Melbourne
Posts: 587
|
Should send that to Casper or whoever handles the aufalcon web site, So they could put is as a technical document.
|
||
|
|
|
|
22-06-2007, 03:43 PM
|
#15 | ||
|
t i c k f o r d
Join Date: Mar 2007
Location: Melbourne
Posts: 183
|
So on a series II/III its as simple as undoing the screws, replace the whole unit and re-attach the wire cable? No fiddling with the springs etc?
__________________
AUIII XR6 VCT Liquid Silver / Manual / Leather / Momo Wheel & Shifter / Premium Sound / Lovells Superlows / Koni Reds / T3 Pursuit Rims / Pacemaker 4499s / 2.5 Inch Exhaust |
||
|
|
|
|
22-06-2007, 04:03 PM
|
#16 | |||
|
Fordless

Join Date: Dec 2004
Location: Sydney
Posts: 2,122
|
Quote:
I've never understood why people call them T-series door handles tho they were on the Ghias & LWB models but they weren't on TE50s I added them to mine tho. |
|||
|
|
|


 Linear Mode
